Ads 468x60px

Showing posts with label Windows. Show all posts

Thursday, January 17, 2013

Disable Auto CHKDSK During Windows Startup

One of Windows annoying so called “feature” is  CHKDSK being automatically being run whenever you don’t shut down your computer properly. You get the blue colored screen that says “Checking file system on C: The type of the file system is NTFS. One of your disks needs to be checked for consistency. You may cancel the disk check, but it is strongly recommended that you continue. To skip disk checking, press any key within 10 seconds(s).
Simply pressing any key would stop CHKDSK from running but when you restart your computer, you’ll get this prompt again. Sometimes even after letting CHKDSK scan the drive that it wants to, CHKDSK would still automatically run at next boot! Here’s how to disable or stop CHKDSK at Windows bootup.

There are some people suggested to edit the registry but the proper way to disable CHKDSK from starting up is using the /x switch on chkntfs command in command prompt. The /x switch will exclude a drive from the default boot-time check. If you have drive C: as your hard drive, then the command to disable chkdsk from scanning C: drive would be:

chkntfs /x c:

If you have 2 drive, C and D, you can disable chkdsk with the command below

chkntfs /x c: d:


The chkntfs utility works by modifying the BootExcecute value in the system registry. The BootExecute value is located in the following, regisstry key
HKEY_LOCAL_MACHINE\SYSTEM\CURRENTCONTROLSET\CONTROL\Session Manager
The default value is for BootExecute is autocheck autochk *. When you use the /x switch, it will add a /k parameter prior to the asterisk. The /k parameter excludes volumes from being checked for the presence of a dirty bit.
For example, I run the command chkntfs /x c: in command prompt. This command would modify this registry entry to autocheck autochk /k:c *

There are some experts believe that it is better not to disable CHKDSK from scanning your hard drive. But as for me, I don’t want CHKDSK to scan my hard drive because if it finds anything bad, it will change the file to File00001.CHK. When that happens, I’ll have to use some third party tools to recognize and recover the CHK file.

Thursday, September 29, 2011

Lock Your Drives Without Using Any Software


How to Lock Your Drives Without Using Any Software

I have allready written about How to Lock Or Hide A Folder, A File Or A Drive On The Computer and How to Lock a Disk Drive in Windows 7, but this time i have another method to lock or protect your hard drive.
this method is pretty simple and it can be done very fast without involving any DOS commands or other awkward procedure. If you want to hide any of your drives or all the other drives in your PC
Then just follow this simple steps.


  • First go to Start then click on Run and type gpedit.msc (Group Policy Editor) then hit enter. You will get Group Policy Editor Window.

  • Navigate to the following node.
User Configuration —> Administrative Templates —> Windows Components —> Windows Explorer.
  • Now go to the right side of that explored window and double click the value mentioned “Hide these specified drives in My Computer”


  • Select Enable and select the drives from the drop down menu.


  • Now press Apply, OK and then close the Group Policy Editor.
  • That’s all. Selected Drives in your PC are locked now.
Note: This setting removes the drive icons. Users can still gain access to drive contents by using other methods, such as by typing the path to a directory on the drive in the Map Network Drive dialog box, in the Run dialog box, or in a command window.
Also, this setting does not prevent users from using programs to access these drives or their contents.


Wednesday, September 28, 2011

How to Lock a Disk in Windows 7


How to Lock a Disk Drive in Windows 7

If you want to protect your valuable information on your hard disk, there is a pre-installed tool in the Windows 7 operating system that you can use. Microsoft's BitLocker is a file encryption utility that you can apply to a single file or an entire drive.
BitLocker establishes a line of defense against Hackers attempting to steal information, because when you lock or encrypt the drive, only the password will grant access to the files.


To Lock a Disk Drive in Windows 7 follow this steps :-


  • Click on the "Start" button. Pick the "Control Panel". Select "System and Security". Choose "BitLocker Drive Encryption".


Click To Enlarge

  • Click on the "Turn on BitLocker" link next to the hard disk drive letter which you want to be locked.
Click To Enlarge

  • Click a check mark in the box next to "Use a Password to Unlock the Drive" in the pop-up dialog box. Type in a password. Click "Next".

  • Click to choose to save the recovery key to a USB flash drive, as a file or print out. Click "Next".
  • Click "Start Encrypting" on the "Encrypt the Drive" page in the dialog box. Monitor the encryption process until a message appears stating the process is complete.


Monday, September 26, 2011

How To Install Windows 8 Developer Preview From USB Flash Drive

How To Install Windows 8 Developer Preview From USB Flash Drive

Windows 8 craze has started, now everyone is eager to test it. Windows 8 Developer Preview is released and available for download for free. If you want to test upcoming Windows 8 operating system in your computer, then you can do this in two way.
one is to install Windows 8 virtually in VirtualBox/Vmware and the other is to install Windows 8 physically in your computer’s hard disk.
Installing Windows 8 physically in computer can be done in two ways
1) burning Windows 8 image file into a blank DVD.
2) using a bootable USB flash drive.
I’ll recommend you to install from USB flash drive because it will be faster, and you don’t need to use any blank DVD.
Creating bootable Windows 8 is very simple, and it takes hardly 10 minutes to complete and in this process you don’t need to mess up with the windows command prompt. some of you know about creating bootable Windows 7 from .iso file, using same way we can make Windows 8 bootable USB pen drive.

How to create Windows 8 bootable USB flash drive and install Windows 8 from USB flash drive :-

Thing you need :
  • Windows 8 Developer Preview Image file (.iso file) download from here
  • Windows 7 USB/DVD Download tool, download from here
  • Flash drive (minimum 4GB)
  • Time -10 min
  • To create Windows 8 bootable USB flash drive we will be taking help of Microsoft’s official Windows 7 USB/DVD Download tool. Using this software we can create bootable flash drive or burn  DVD from .iso file. So first download the software and install it.

Now start Windows 7 USB/DVD Download Tool from Start menu.


Browse and choose the Windows 8 Developer Preview .iso file and click Next.


Now select USB device.


In this step select the drive letter of USB flash drive (be careful) and click Begin Copying.  Now this tool will extract the Windows 8 .iso image file to the USB flash drive.


This process will take almost 10 minute time.
When the all processes are complete eject USB flash drive.


Reboot computer and enter BIOS, select the USB flash drive as first boot device and save setting.
Next time when you start computer then it will boot from USB flash drive.
Windows 8 installation will start, just follow simple instructions and you will be able to install Windows 8 from USB flash drive without using CD/DVD.


If you need any more help then please leave a comment.


How To Install Windows 8 Developer Preview In VirtualBox


Install Windows 8 Developer Preview In VirtualBox

If you are not living inside cave, then you should know that Windows 8 Developer Preview version is released and it can be downloaded and installed for free. You can install latest Windows 8 in your computer in traditional way that means by burning the Windows 8 image file (.iso) and booting from the DVD.
But I’ll recommend you to install Windows 8 using Virtualbox as Windows 8 is currently in developer stage and it does not contain all features and not ready as a primary operating system. in addition it’s still glitchy and you can’t easily downgrade to Windows 7.
Today I’m going to show you how to install Windows 8 Developer Preview version in VirtualBox. When installing Windows 8 in VirtualBox you need to change some options otherwise it will not work.


To install Windows 8 Developer Preview in VirtualBox follow this tutorial

Things you need :
  • Windows 8 Developer Preview Image file (.iso file) download from here
  • Oracle VM VirtualBox v4.1.2 download from here
  • Your computer must have Intel Processor with Virtualization Technology or AMD Processor with AMD-V technology
  • Time- 30 min

Download both Windows 8 Developer Preview Image and VirtualBox.
Note:- If you are running 64bit windows then you can either download 32bit Windows 8 or 64bit Windows 8. But if you are running 32bit Windows then you should download 32bit Windows 8.
First  install VirtualBox in your computer.


    Start VirtualBox and select ‘New’


      Click Next


        In ‘create new virtual machine’ window enter ‘Windows 8′ in the name field and select Windows 7 in under version drop down menu and click ‘Next’.

        Here you have to select the amount of RAM the virtual machine will be using. I’ll recommend you to select at least 1GB RAM here. Click ‘Next’.


        In this screen you don’t need to change anything, just click ‘Next’.


        In virtual disk creation wizard select VDI and click ‘Next’.


        Here you can either select Fixed size or ‘Dynamically allocated’option.
        Use ‘Dynamically’ allocated option for faster performance but it will use more virtual disk space.


        If you select Fixed size, it will not use more virtual disk space as allocated by the user.


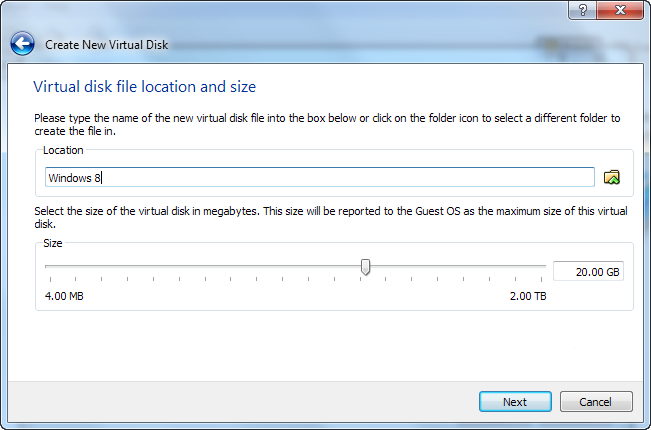
        In next screen select the virtual disk size and location.
        I’ve selected 20GB space here. Now click ‘Next’ to create the virtual disk.


        After that you will be given a quick summary of the settings you have selected.Click Create to begin creating virtual disk file.


        It will take anywhere from 5 minutes to 30 minutes to create a virtual disk space,
        i.e, a fixed medium storage unit. Please note that it can take more than 30 minutes if you have allocated more than 20GB hard disk space for new machine.


        You will be taken to the main interface where the Virtual machine will be ready.


        Now in VirtualBox main windows right click on Windows 8 and select settings Under system setting open Acceleration tab and make sure both options are enabled like this
        Note:- Here is where you need to pay close attention, if you CANNOT access this tab, it means that your CPU either doesn’t support hardware virtualization technology or it is disabled in which case you’ll need to get the motherboard manual and see how to enable this feature. 


        When Done, move to Motherboard Tab and make sure that Enable IO APIC is checked. You can uncheck Enable absolute pointing device since it is not used by most users.


        In Processor tab enable PAE/NX and select no of processor 1 or 2. ( Depending on your system )


        Now navigate to Storage:

        Under IDE Controller, select Empty, and on the right, click the CD icon to browse and locate the Windows 8 Developer Preview ISO image, and click OK to finish with the settings customization.


        Next start the virtual machine and if everything went correctly, you will see Windows 8 installation process.


        After the installation is finished eNjoY your Windows 8 Developer Preview on VirtualBox...!!!

        If you get any error during installation make sure Virtualization technology is enabled in your computer.To check it, reboot your computer and enter BIOS and see the settings.
        If it is disabled then enable it from BIOS.


        ......................................................................................................................................................

        How to Dual-Boot Windows 7 and Windows 8 Side By Side


        How to Dual-Boot Windows 7 and Windows 8 Side By Side

        The Windows 8 developer preview is out for all to try, but installing it over your main Windows setup is a scary (and unrealistic) prospect.
        Here's how to dual boot Windows 8 with your current Windows 7 installation so you can run them both side by side.
        If you've ever dual booted a machine before, this shouldn't seem too foreign.
        All you need to do is create a new partition for Windows 8, install it on that partition, and then edit your new boot menu so Windows 7 stays the default OS. Here's how to do it.


        Step 1: Create a New Partition


        Before you start, make a backup of your data. you're going to be formatting drives and installing OSes, so anything could go wrong, and you don't want to lose your whole system. When you're ready, we'll need to create some space for Windows 8 on your hard drive. Assuming you have at least 20GB of space free on your drive, you're going to use Windows' Disk Management to set partition those 20GB for Windows 8. Open the Start Menu and right click on the "Computer" option. Click "Manage", and in the window that appears, click on "Disk Management" in the left sidebar.


        Find your system hard disk in the graphical list that appears in the bottom pane. Right-click on it and then click "Shrink Volume". Shrink it down so you have at least 20GB of space left on the end of the drive, and click OK. Then, click on the "Unallocated" block of that drive that appears and click "New Simple Volume". Click Next on the next few windows until you get to the "Format Partition" window. Here, give it a volume label you'll recognize (like "Windows 8") and click Next. It should format the drive for you. Now you're all set to install Windows 8.

        Step 2: Install Windows 8


        If you haven't downloaded the Developer Preview ISO yet, head over to the Windows Developer Center and download it. Burn it onto a DVD using something like ImgBurn, or burn it to a USB drive if you don't have a DVD drive in your machine. Make sure your computer is set to boot from CD or USB, stick in your installation media, and reboot.
        for Details about Downloading, visit Older Post about Windows 8 Developer Preview Available for download..

        If you get a prompt to "Press any key to boot from DVD", then hit a key on your keyboard. You should boot right into the Windows 8 installer. It actually looks almost exactly like the Windows 7 installer, so it should seem a little familiar. Just pick your language, hit "Install Now", and choose "Custom" when asked what type of install you'd like to perform.

        On the next screen, find your new partition on the list of drives. Make sure it's the right one, because you're about to write over whatever's on it. Hit "Next" and let the installer do its thing. When you're done, your computer should reboot into Windows 8. It'll probably reboot one more time after it does, then you'll be greeted with the Windows 8 Start screen. If you choose to enter a Windows Live ID here, make sure you have access to your email and can confirm your computer—otherwise it might not let you boot into it.

        Step 3: Make Windows 7 the Default (Optional)


        You'll notice when you first boot up into Windows 8 that you're presented with a new graphical boot menu that'll let you choose between your Windows 7 and Windows 8 installations. Windows 8 will be the default, meaning if you don't manually choose Windows 7 from the menu, your computer will boot into Windows 8 after three seconds of inactivity. Chances are, you don't want to make Windows 8 the default quite yet, so here's how to make Windows 7 the default.

        On the boot menu, click on the button at the bottom that says "Change Defaults or Choose Other Options", and hit "Choose the Default Operating System". From there, you can pick Windows 7 from the menu. From now on, your computer will boot into Windows 7 by default, but if you feel like playing around with Windows 8 that day, you can just pick it from the boot menu. Enjoy playing with the developer preview, and let us know what you think in the comments.


        Windows 8 Developer Preview Available for download


        Windows 8 Developer Preview Available for download

        Given Windows 7’s mostly sterling reception on desktop and laptop computers, you might be forgiven for asking why we need a Windows 8 so soon especially one that’s a huge departure from 2009’s release.

        After all, Microsoft's tagline for Windows 8 is "Windows Reimagined" and that’s a pretty bold prospect.
        The impetus, of course, came in 2010, down the Pacific Coast from Microsoft’s Washington headquarters. Namely, it started in Cupertino, Calif., in the form of Apple’s first great touch-input tablets and the new industries it spawned. And it rolled north fast. With three huge trends—touch interfaces, the emergence of Android as a competitor to Apple’s iOS, and the mobile-app revolution—taking off with rocket boosters attached, Windows has been something of a third-wheel operating system (OS) at the touch-computing party.


        Indeed, to date, Windows' track record on tablets—especially ones for consumers—has been mostly a flop. The touch support has been ungainly, and the overall sensation is of Windows having been shoehorned into the hardware. That's meant an uphill battle for Windows against the likes of iOS and Android, both built as touch interfaces from the ground up. Clearly, taking an OS designed for desktops and notebooks, making a few adjustments, and expecting it to run well on tablets is not the way to go. A new approach to Windows is exactly what Microsoft is rolling out, in the hopes of making mobile, touch-input Windows devices viable. Thus: the September introduction of the nascent Windows 8.

        The Windows Developer Preview is a pre-beta version of Windows 8 for developers. It may not be stable, operate correctly or work the way the final version of the software will.. The features and functionality in the prerelease software may not appear in the final version. Some product features and functionality may require advanced or additional hardware, or installation of other software.


        Windows Developer Preview with developer tools English, 64-bit (x64)


        DOWNLOAD (4.8 GB)
        Sha 1 hash - 6FE9352FB59F6D0789AF35D1001BD4E4E81E42AF
        All of the following come on a disk image file (.iso). See below for installation instructions.
        • 64-bit Windows Developer Preview
        • Windows SDK for Metro style apps
        • Microsoft Visual Studio 11 Express for Windows Developer Preview
        • Microsoft Expression Blend 5 Developer Preview
        • 28 Metro style apps including the BUILD Conference app


        Windows Developer Preview English, 64-bit (x64)

        DOWNLOAD (3.6 GB)
        Sha 1 hash – 79DBF235FD49F5C1C8F8C04E24BDE6E1D04DA1E9
        Includes a disk image file (.iso) to install the Windows Developer Preview and Metro style apps on a 64-bit PC.

        Windows Developer Preview English, 32-bit (x86)

        DOWNLOAD (2.8 GB)
        Sha 1 hash - 4E0698BBABE01ED27582C9FC16AD21C4422913CC
        Includes a disk image file (.iso) to install the Windows Developer Preview and Metro style apps on a 32-bit PC.

        Live SDK

        The Live SDK provides a set of controls and APIs that enable applications to integrate Single Sign On (SSO) with Windows Live ID and access information from SkyDrive, Hotmail and Windows Live Messenger. To learn more, sign up for our technical preview.

        System Requirements

        Windows Developer Preview works great on the same hardware that powers Windows Vista and Windows 7:
        • 1 gigahertz (GHz) or faster 32-bit (x86) or 64-bit (x64) processor
        • 1 gigabyte (GB) RAM (32-bit) or 2 GB RAM (64-bit)
        • 16 GB available hard disk space (32-bit) or 20 GB (64-bit)
        • DirectX 9 graphics device with WDDM 1.0 or higher driver
        • Taking advantage of touch input requires a screen that supports multi-touch
        • To run Metro style Apps, you need a screen resolution of 1024 X 768 or greater

        Notes about installing the Windows Developer Preview

        • You can't uninstall the Windows Developer Preview. To reinstall your previous operating system, you must have restore or installation media.
        Install on:Windows Developer
        Preview with
        developer tools
        Windows Developer
        Preview
        (32-bit or 64-bit)
        Windows 7
        and
        Windows Vista
        Clean install onlyYou can keep
        accounts, files,
        and settings
        Windows XPClean install onlyYou can only keep
        accounts and files
        A clean install is supported on all builds.
        You will only receive the full set of installation options when setup is launched in Windows.

        How to install the Windows Developer Preview from an ISO image

        The Windows Developer Preview is delivered as an .iso image that must be converted into installation media stored on a DVD or a USB flash drive. On Windows 7, the easiest way to convert this file is to use Windows Disc Image Burner. On Windows XP and Windows Vista, a third-party program is required to convert an .iso file into installable media—and DVD burning software often includes this capability.
        Note: The .iso file that contains the developer tools requires a large capacity DVD called a DVD-9, as well as a DVD burner that can handle dual-layer (DL) DVDs. Most modern burners should be able to handle this format.


        Friday, September 9, 2011

        How To Fix Generic Host Process for Win32 Services Error and Error 88780078

        How To Fix Generic Host Process for Win32 Services Error and Error 88780078

        Many Windows user have noticed about the Error 88780078 and Generic Host Process for Win32 Services Error. Today I am going to Explain about How to fix this bug with some simple steps. Just check the following pictures. Is your problem the same? Windows showing generic host process for win32 error and some services stop such as Windows Firewall is disabled and many times windows shows bad sound driver with error 88780078 but some sounds work on the system.


        Without wasting time do the following three steps, though any one of the step may fix the bug lets prevent the bug by doing all the three steps

        Step-1
        Goto Control Panel –> Click Automatic Updates –> Turn off Automatic Updates

        Step-2
        Start –> Run –> Type Regedit and press enter.
        Navigate to HKEY_LOCAL_MACHINE >> System >> CurrentControlSet >> Services >> NetBT >> Parameters and on the right side, double-click TransportBindName
        Press delete and give it an empty value. That will close port 445.
        Also, go to HKEY_LOCAL_MACHINE >> Software >> Microsoft >> OLE and change the value of EnableDCOM from Y to the value N – that will close port 135. If you know how, you may also disable NETbios ( I don’t know that).

        Step-3
        Install the latest Microsoft Fix downloading from here. Download the patch related to your Operating System.


        • You are Done...!!! Restart the computer.

        NOTE:- I also observed that this problem can occur mainly due to bugs in Winamp.
        So be careful with the package of Winamp or else use VLC or Windows Media Player.


        Use PenDrive as RAM in windows XP


        How to Use your Pendrive as RAM in Windows XP

        RAM in a computer is its memory and its a main component of Computer. The more RAM computer has, the more speedy and faster the process will do . As we all know that Computer we newly purchase has only 1 or 2 GB RAM and that's to low for an average person. And the computer can't run High Power consuming softwares. moreover, Gamers will face problems due to low RAM. They can add more RAM to Boost PC Speed but indeed it requires to spend money.
        But Now it can be done in a cheaper way, as i mentioned to Use your Pendrive as RAM in my earlier post.
        it was for Windows Vista and 7, but now it is also available for windows XP.


        You can convert your pen drive into RAM without any software by following simple steps as given below :-

        • Insert the Pen Drive (1GB at least) in the USB port [try to prefer 4GB].
        • Wait and Let the PC detect it.
        • After the pendrive is detected follow this steps.
        • Right Click on My Computer -> Properties
        • Advanced -> Performance Settings
        • Advanced -> Change
        • Select the Pen Drive
        • Click on Custom Size and  “Check the value of space available”
        • Enter the same in the Initial and the Max columns "You just used the space of the PenDrive as a Virtual Memory"
        • Just Restart the PC
        • That's it, You have Done…!!!
        Your PC is faster now.


        Thursday, September 8, 2011

        How to use pendrive as ram

        How to Use your Pendrive as RAM for Windows PC

        I have already written about the Standard methods to improve system performance. But after using all these methods if your system works  slowly,Then you should increase your RAM. RAM(Random Access Memory) is the form of computer memory, it considered “random access” because you can  access any memory cell directly if you Know the row and column that intersect at that cell. RAM can easily be added to computer till maximum capacity of motherboard . RAM can get expensive, but you can use your Flash drive(Pen Drive) as RAM. This is cheaper way to increase system Random Access memory.

        Just Follow the steps given below to increase your RAM.

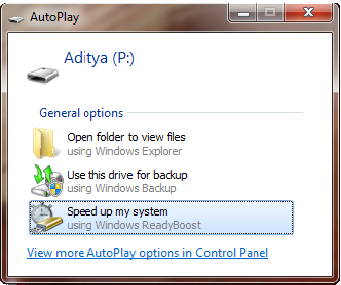
        First insert your flash drive in USB port. Now an Auto-play window will open. Click on “Speed Up My System” option.


        Now select the check-box of option Dedicated this device to ReadyBoost and Apply this setting.


        If Auto-play is turnoff then go to flash-drive in My Computer.
        Right click on drive and open their properties (last option).
        Now a window will open of flash-drive properties, select Readyboost tab and follow step 2.