Ads 468x60px

Showing posts with label Yahoo. Show all posts

Saturday, October 1, 2011

Multiple login in yahoo Messenger without any Software


Multiple login in yahoo Messenger without any Software

In my earlier post i wrote about multiple login in GTalk.
Many users use yahoo messenger for chating purpose.
like GTalk you can login with multiple id’s in YAHOO messenger also without installing any extra software or patches.
It can be done by editing registry,
to login with Multiple id's in YAHOO messenger just follow some easy steps given below.

Steps:

  • Go to Start –> Run. Type regedit press Enter.
  • Navigate to 
HKEY_CURRENT_USER —> Software —> yahoo —> pager —> Test.
  • On the right page , right-click and choose New Dword value .
  • Rename it as Plural.
  • Double click the Plural and change the decimal value to 1.
  • Close the registry and restart your YAHOO messenger.

Now you can open as many as YAHOO messengers for different users to login.


Friday, September 2, 2011

How to setup a Yahoo! Mail email account in Windows Live Mail


How to setup a Yahoo! Mail email account in Windows Live Mail


The ability to access Yahoo! Mail via Windows Live Mail is only available to customers of Yahoo! Mail Plus service.

But you can try this on simple mail after you have Enable POP3 in your yahoo! Mail Account.

for the Details on How to Enable POP3 in the Yahoo! Mail refer to my older post about How to Enable POP3 in the Yahoo! Mail.


Here is what you'll need to set up your Yahoo! Mail account in Windows Live Mail.


1.  Open Windows Live Mail.


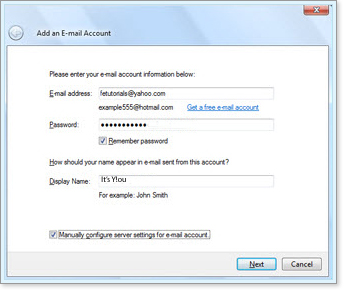
2.  Click Add e-mail account in the left side of Window Live Mail. Add e-mail account opens.


3.  Do the following for the email account items in Add e-mail account: 


  • E-mail address Required

  • Type your full Yahoo! Mail email address in the following format user@yahoo.com.


  • Password Required

  • Type your Yahoo! Mail password.


* It's safe to give your password to Windows Live Mail. 


  • Remember password

  • Optional Click the box to remove the check if you don't want your Yahoo! Mail password retained.


  • Display Name Required

  • Type a name you want to show as the sender.


  • Manually configure server settings for e-mail account Required

  • Click the box to check it.


4.  Click Next.


Add an E-mail Account shows server information that will link Windows Live Mail and your Yahoo! Mail account. With this information, Windows Live Mail can receive and send your e-mails.


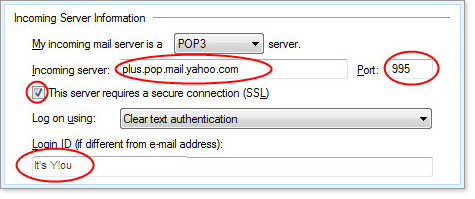
5.  Do the following for the Incoming Server Information items in Add e-mail account.


  • My incoming mail server is a Required

  • Choose POP3.


  • Incoming server Required

  • Type pop.mail.yahoo.com.


  • Port Required

  • Type 995.


  • This server requires a secure connection (SSL) Required

  • Click the box to check it.


  • Log on using Required

  • Leave the setting at Clear text authentication.


  • Login ID (if different from e-mail address)

  • Required Type your Yahoo! Mail user name (the part of your email address that comes before "@domain.com")—for example, jo.bloggs.


6.  Do the following for the Outgoing Server Information items in Add e-mail account:


  • Outgoing server Required

  • Type smtp.mail.yahoo.com.


  • Port Required

  • Type 465.


  • This server requires a secure connection (SSL) Required

  • Click the box to check it.


  • My outgoing server requires authentication Required

  • Click the box to check it.


7.  Click Next. 


8.  Set your Account.


If Windows Live Mail successfully connects to Yahoo! Mail's servers, Add an E-mail Account displays the message You have successfully entered in the information required to set up your account. If you have multiple accounts and you want to set the Yahoo! Mail account as the default account, click Set this account as the default mail account.


9.  Click Finish.


Simple way to POP Yahoo! Mail with Microsoft Outlook 2007


Simply POP Yahoo! Mail with Microsoft Outlook 2007


In Our Early guide i show you How to Setup Yahoo! Mail in Outlook 2007 but now i have a easy way for that

If you want to "POP" your Yahoo! Mail into your Outlook 2007 application, Just follow the Steps.


  1. From the Tools menu, select "Account Settings." If you do not see "Account Settings," place your cursor over the two arrows at the bottom of the list to display more choices. 

  2. On the Email tab, click New.

  3. Check the box next to the first option, “Microsoft Exchange, POP3, IMAP, or HTTP” and click Next.

  4. In the Your Name box, type your name as you'd like it to appear when you send a message. 

  5. In the Email Address box, enter your Yahoo! Mail address (for example, "user@yahoo.com"). 

  6. Check the box for “Manually configure server settings or additional server types” and click Next.

  7. Check the box next to the first option “Internet E-mail” and click Next.

  8. In the Server Information area, under “Account Type” select POP 3 from the pull-down menu.

  9. In the Incoming mail server field, enter: pop.mail.yahoo.com.sg

  10. In the Outgoing mail server (SMTP) field, enter: smtp.mail.yahoo.com.sg

  11. In the Login Information area, in the User Name field, enter your Yahoo! ID (your email address without the "@yahoo.com"). 

  12. In the Password box, enter your Yahoo! Mail password. 

  13. Check "Remember Password" if you don't want Outlook to prompt you for your password each time you check your mail. Handy! 

  14. Do not check the box labeled "Log on using Secure Password Authentication (SPA)." 

  15. Click on the More Settings button.

  16. Click on the Outgoing Server tab and check the box next to “My outgoing server (SMTP) requires authentication.”

  17. Click on the Advanced tab. 

  18. Under “Incoming Server (POP3)”, check the box next to “This server requires an encrypted connection (SSL)". The port number in the “Incoming Server (POP3)" field should automatically change from 110 to 995. If it doesn’t, make sure the port number is set to 995. 

  19. Under “Outgoing Server (SMTP)”, check the box next to “This server requires an encrypted connection (SSL)". Enter port number “465” in the “Outgoing Server (SMTP)” field. 

  20. If you'd like to keep a copy of your email messages on the Yahoo! Mail server, check the box next to "Leave a copy of messages on the server." If you want to delete your messages from the Yahoo! Mail server after viewing them in Outlook, don't check the box. 

  21. Click the OK button.

  22. Click the Next button on the Email Account Wizard, then click Finished.

  23. Would you like your Yahoo! Mail inbox to be your primary inbox in Outlook 7? If so, click the Tools menu and select "Account Settings." If you don’t see "Account Settings," place your cursor over the two arrows at the bottom of the list to display more choices. 

  24. From the list, select the pop.yahoo account you've just added and click the Set as Default button. 

  25. Click the Close button. You’re done!


Troubleshooting instructions :


If you followed the above configuration steps, you should be all set. However, if you cannot send or receive mail with your email client, try the following tips.


The Yahoo! Mail SMTP server requires authentication. Make sure you have enabled SMTP authentication. To turn this setting on, follow these steps:


  1. From the Tools menu, choose "Account Settings." 

  2. Select the "E-mail" tab.

  3. Select your Yahoo! Mail account and click Change.

  4. Click on the "Outgoing Server" tab. 

  5. Check the box next to "My Server Requires Authentication." 

  6. Please make sure that "Log on using" is not checked. 

  7. Click OK.


To control deletion of messages from the Yahoo! Mail server:


  1. From the Tools menu, select "Account Settings." 

  2. Click on the "Email" tab.

  3. Select your Yahoo! Mail account and click Change.

  4. Click on the "Advanced" tab.

  5. Check "Leave a copy of messages on server" if you want to save your Yahoo! Mail messages on the Yahoo! Mail server as well as on your local computer. Please note that setting your email client to remove messages from the server will cause your messages to be deleted from the server. Once the messages are deleted, we are unable to retrieve them. 

  6. Click OK.

  7. Close Microsoft Outlook and restart.


I strongly recommend that you enable SSL for both POP and SMTP, as detailed in the above instructions. This will ensure that your Yahoo! ID, password and email messages are transmitted securely between your mail client and the Yahoo! servers. However, if you choose to not use SSL for SMTP, your email client will likely default the SMTP port to 25. If your ISP blocks port 25 or if you're unable to send email, then you will need to use port 587 when sending via Yahoo!'s SMTP server. To make this change, please follow the directions below:


  1. From the "Tools" menu, select "Account Settings"

  2. Select your Yahoo! POP account and click on Change. 

  3. Click on the "Advanced" tab.

  4. Click OK and Close.


How to Setup Yahoo! Mail in Android


How to Setup Yahoo! Mail in Android


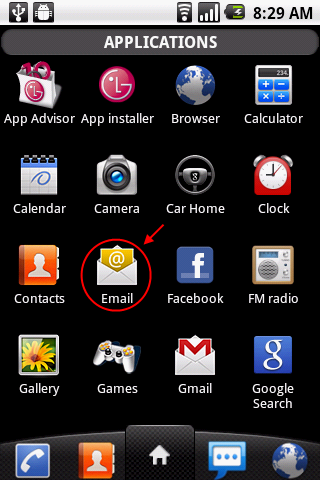
If you want to read your Yahoo! mails in your Android, you can either use the official mail App or you can use the POP3 option. The advantage of using POP3 is that you can combine your mails from other mail account (e.g. Hotmail) into one inbox! Here is the guide.


1. Open the email app.


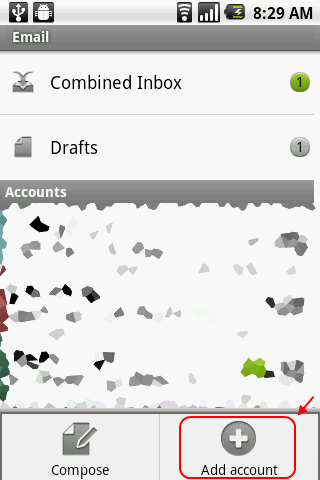
2. Click on the physical Menu button on your phone to bring up the menu. Select "Add account".


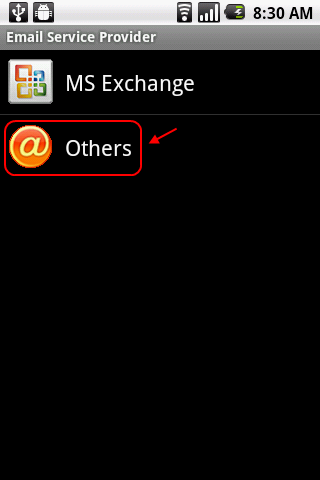
3. In the Email Service Provider screen, select Others.


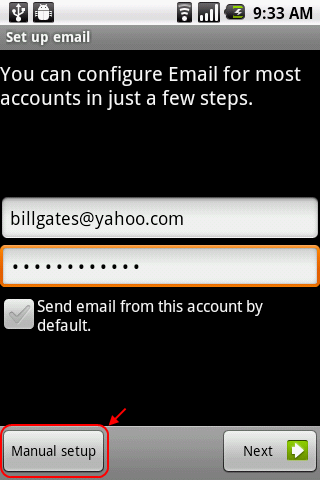
4. Enter your Yahoo! Mail address and password. Check the “Send email from this account by default option” if you want to send email using this account by default. You can click Next and let the mail app to detect the settings. But in this guide, I’ll set it up using the manual method. So, click on “Manual setup” button.


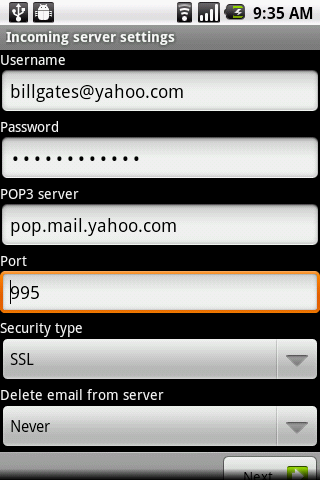
5. In the Incoming server settings screen, fill in your username (full email address) and password. The POP3 server is pop.mail.yahoo.com and the port is 995. For security type, select SSL.


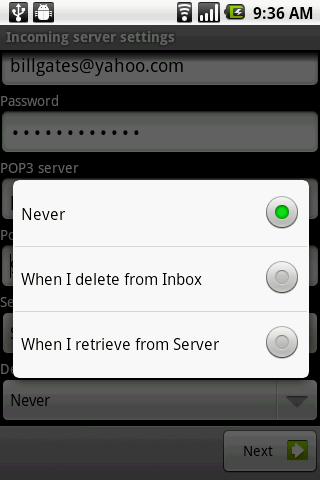
Depending on your preference, you can either keep the email in the web or delete it after you downloaded the email into your phone.


Never – Never delete email in Yahoo! server. (You can still access it from Yahoo! Mail web)

 When I delete from Inbox – Delete the email in Yahoo! server when you deleted it in your Android phone.

 When I retrieve from Server – Delete the email in Yahoo! server after the email is downloaded into your phone. You won’t be able to view the email in the web anymore!


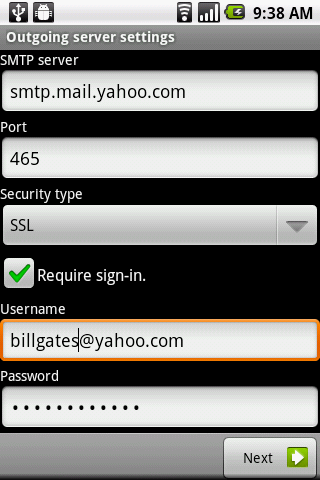
6.  Next, enter the details of the SMTP server. This is the server that you’ll use for sending emails. The SMTP server is smtp.mail.yahoo.com, port is 465, security type is SSL and check the Require sign-in checkbox. Then enter your username (full email address) and password. Click Next.


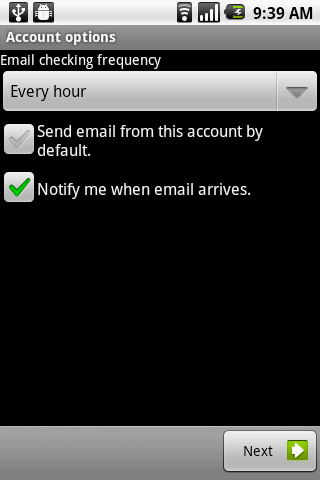
7. Select the options that fit your preference and click Next.


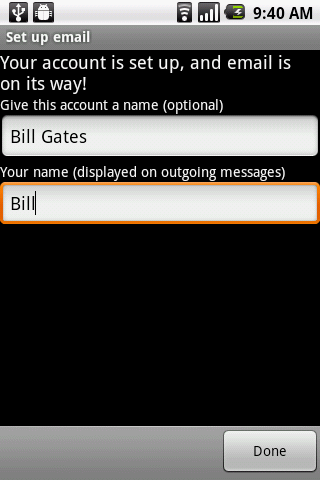
8. Give the account a name (this name will show in your Inbox) and the name you want to use when sending email. Then click done.


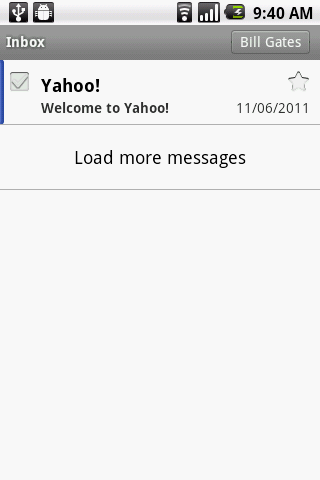
9. Now you can read your Yahoo! Mail using your Android smartphone!


How to Enable POP3 in the Yahoo! Mail


How to Enable POP3 in the Yahoo! Mail


In my previous post on How to Setup Yahoo! Mail in Outlook 2007 i wrote that " If you are getting “Enter Network Password” error, please make sure that you have POP3 enabled in your Yahoo! Mail option! "


This post is about How to Enable POP3 in the Yahoo! Mail. In New Yahoo! Mail many changes in the interface has been made. Luckily, the method still works! Here is the guide with screen shots of New Yahoo! Mail.


1. First, login into your Yahoo! Mail account.
2. Then click on Options and select Mail Options. In the Mail Options menu, click on POP & Forwarding. You’ll see that you need to upgrade to Yahoo! Plus to get the POP and forwarding option.


Click To Enlarge


3. Click on your username, and select Account.


Click To Enlarge

4. In the Account Info page, go to the Account Settings section and click on Set language, site, time zone.


Click To Enlarge


5. Next, select a Regional Site and Language and Time Zone. Select Yahoo! Asia and change the time zone to China (just to be safe). Then click I Accept.


Click To Enlarge


6. Once you finish, logout from your Yahoo! account and close all browser windows. Reopen your browser, and login into Yahoo! Mail.

7. Go back to the Mail Options page (refer to step 2) and click on POP & Forwarding. Now you’ll see that you have the POP & Forwarding option enabled! Remember to select “Allow your Yahoo! Mail to be POPed” and save the changes!


Click To Enlarge


8. Voila! Now you can use POP3 with your Yahoo! Mail account! The settings for the POP3 are as below:-


Incoming Mail Server (POP3): pop.mail.yahoo.com (Use SSL, port: 995)

 Outgoing Mail Server (SMTP): smtp.mail.yahoo.com (Use SSL, port: 465, use authentication)

 Account Name/Username: <Your Yahoo! Mail address>

 Email address: <Your Yahoo! Mail address>

 Password: <Your Yahoo! Mail password>


Follow my guide here on how to setup Yahoo mail in Microsoft Outlook 2007!


Remember to check this guide too before using the POP3 in Outlook.


The screen might change from time to time, so the screen shot here might not be the same by the time you are reading this. And I can’t guarantee that this will work for everyone.!


Using POP3 without Deleting Yahoo! Mails in the Web Inbox


Using POP3 without Deleting Yahoo! Mails in the Web Inbox


In my previous post on How to Setup Yahoo! Mail in Outlook 2007 i mentioned that  Emails in your webmail will be deleted after using POP3.

This behavior is perfectly normal! But Don’t worry,

There is a way to fix this ‘problem’.

Just follow the simple steps Given in this Tutorial.


  • In Outlook menu bar, select Tools -> Account Settings.


  • Select the mail account and click on the “Change…” button on top.


Click To Enlarge


  • In the Change E-mail Account windows, click on the “More Settings…” button.


Click To Enlarge


  • Select the “Advance” tab.


Click To Enlarge


  • Check “Leave a copy of messages on the server”.

  • There are two more options at bottom that  you can check.

  • You can either choose to delete the emails from the mail server after certain period of time or remove those permanently deleted emails.


Click To Enlarge


  • And you are done! This guide should work for other emails provider that use POP3 as well. Please give your comment below!


Yahoo POP3 Access for Free using a Software


Yahoo! Mail POP3 Access for Free using a Software


Email is one of important part of our electronic communication, it has become such a vital element of our life that we can’t see our self without email. We have so many good free webmail services like Gmail, Yahoo, AOL and Windows live mail not all of them provide all features like POP3 access, IMAP access, filters, forwarding etc.


Yahoo Mail is one of them which don’t provide POP3/IMAP service for free account holder. Basically POP3 is service which makes you free from manually checking emails via login to your webmail account. With POP3 service you can use any email client like outlook, thunderbird to read your emails. Here is a way by which you can get Free POP3 access for Yahoo Email, YPOPs! is a free open source software that provides POP3 and SMTP access to Yahoo! Mail.


YPOPs is more like a gateway. It provides a POP3 server interface at o­ne end to talk to email clients and an HTTP client (browser) interface at the other which allows it to talk to Yahoo!


Screenshot of YPOPs way to get POP3 aceess for Yahoo Mail


Download YPOPs 0.9.7.1. for Windows and get Free POP3 and SMTP Access on Yahoo Mail.


How to Setup Yahoo! Mail in Outlook 2007


How to Setup Yahoo! Mail in Outlook 2007


This guide will teach you on how to setup your Yahoo! Main in Outlook 2007. First you need to enable POP3 in your Yahoo! Mail account. You can follow my guide here on how to enable POP3 in Yahoo! Mail.


  • Please note that the mails in your web inbox will be deleted once they are downloaded to your Outlook. Please follow the guide here if you want to keep your mails in your web inbox.


1. First, Go to Tools -> Account Settings.


2. Click on ‘New’.


3. Select ‘Microsoft Exchange, POP3, IMAP, or HTTP’ and click Next.


4. Tick ‘Manually configure server settings or additional server types’ and click Next.


5. Select ‘Internet E-mail’.


6. Fill in your account details.


Your Name: <Your display name in the email>

 E-mail Address: <The email address that you are setting up>

 Account type: <POP3>

 Incoming mail server: <pop.mail.yahoo.com>

 Outgoing mail server: <smtp.mail.yahoo.com>

 User name: <Your Yahoo! Mail address>

 Passowrd: <Your Yahoo! Mail password>


Once you’re done, click the ‘More Settings…’ button.


7. The ‘Internet Email Settings’ windows will pop up. Click on the ‘Advanced’ tab. Change the Incoming server (POP3) to 995. Tick the ‘This server requires an encrypted connection (SSL)’. Then, change the ‘Outgoing server (SMTP) to 465 and Select ‘SSL’ in the drop down list.


8. Next, go to the ‘Outgoing Server’ tab and tick the ‘My outgoing server (SMTP) requires authentication’ option. Select ‘Use same settings as my incoming mail server’. Then click ‘OK’.


9. Click on the ‘Test Account Settings’ button.


  • You should be seeing the following screen if all the settings are correct:


10. Once you’re done, click ‘Next’.

Congratulations! You just finish setting up your Yahoo! Mail in Microsoft Outlook 2007!


If you have large Inbox, it will take some time for Outlook to download all the mails.


  • If you are getting “Enter Network Password” error, please make sure that you have POP3 enabled in your Yahoo! Mail option! You can follow my guide here on How to Enable POP3 in Yahoo! Mail account.