Ads 468x60px

Showing posts with label Facebook. Show all posts

Wednesday, December 28, 2011

How To Update Facebook Status Through Gtalk

How To Update Facebook Status Through Gtalk

There are Multiple methods available to update status on Facebook right from your Browser, Mobile web or SMS. Now you can update your facebook status even from your Gtalk or any other IM Service you use. In my Previous post I have mentioned about the translation bot in GTalk. You just need to add a IM bot to your Gtalk and authorize it in short simple steps. You shall then post the message as such chatting with your friend. Easy to setup, You will be able to post the facebook status within a minute from now.
Just follow the Easy steps given below:

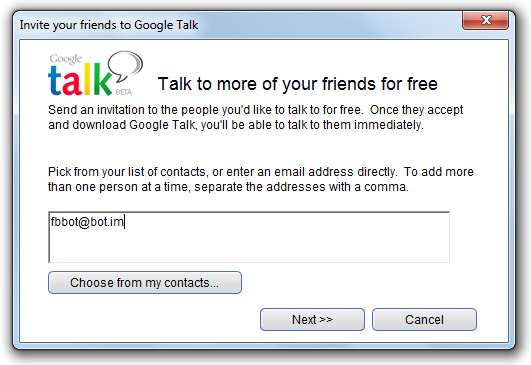
  • Invite fbbot@bot.im bot to your Gtalk (Once invited, the bot becomes Visible in couple of seconds).
  • Click Here and  Allow the app to access your facebook Account by clicking Allow button.


  • Once done, You will receive a long verification Code. just copy it
  • Now, Open the Chat window of the Bot and Send the Verification code.
  • You will receive this update on the Chat Window. “You are added. You can Start posting”
  • That's all, You can Start Posting status Now...!!!


Tuesday, December 27, 2011

Get Timeline for Your Facebook Profile

Get Timeline for Your Facebook Profile


The regular readers of my blog have already read about the timeline feature of facebook in my earlier post. Some of them have already enabled the timeline feature of the facebook by the facebook developer trick.
but some of the readers have not enabled the timeline feature till now due to the complex process of developer trick.
Now All facebook users can get the timeline feature bcoz Facebook has now decided to finally start rolling it out for the general public. It is way easier now to get this long awaited timeline feature.

All you have to do is just go to the Facebook Timeline presentation by clicking here and right there bottom right, click on the “Get Timeline” button as shown in the image below.

Click To Enlarge

This will enable will the Facebook Timeline 7 – Day Preview, that will allow you to edit, hide or delete the posts or pictures you don’t want the rest of the world to see!


After you are done with all of that, on the top of your profile page, now the timeline page, go ahead and click on the ”Publish Now” button and that’s it you have finally enabled the Facebook Timeline.


Sunday, September 25, 2011

Hack Your Way Into Facebook's New Timeline Feature


How To Enable/Disable New Facebook Timeline Profile NOW.?

Most users will have to wait a few weeks before they get to see Facebook’s most drastic changes to the service since the company was founded, but you can use a developers' workaround to gain access to the Timeline feature right now.

Developers already have access to early beta versions of the new features. Luckily for users eager to try out the revamped Facebook, becoming a developer is a simple process that shouldn’t take you more than 5 or 10 minutes.

Facebook announced the updates on  at the company’s f8 developers' conference.

Step-by-Step Instructions on How to Enable TimeLine Profile Feature?

  • First, log into Facebook and enable developer mode. The easiest way to do this is to just type “developer” into Facebook’s search box and click the first result. It should look like this

OR

  • Login Facebook and access the developer app  (click on Allow button)


  • Now you will see a screen that looks something like this.


  • This is the basic developer page. We’re going to convince Facebook we’re real developers and create an app that uses its new “Open Graph” tech. Don’t worry, it’s not nearly as hard as it sounds.

  • Now, create a new app by clicking the button in the top left corner. Nobody but you will see the app, so the information you enter doesn’t actually matter. Just create an app name and namespace (the latter needs to be all lowercase), agree to the terms and conditions, and create the app. Now you should arrive at the app’s main setting screen, as shown below:

  • Click on the link labeled “Open Graph” on the left (not shown here) to open up the Open Graph Getting Started page.
  • To get started with Open Graph, you’ve got to fill in an action your app can do and an object for your app to interact with. This can be any verb and noun.
  • After you’ve created your action and object, click the Get Started button. This will drop down the first of three pages of settings but, since no one will see them, they shouldn’t matter.


  • Quickly click through them to create your app.
  • When you’re done, you should see a page like this:


Now, come back your Facebook profile, the TimeLine feature appears.

Click on Get it now to enable the redesign profile with TimeLine.


How to Disable TimeLine Profile Feature?

If you’re still not ready with the new interface and want to return to the old, let’s visit the Developer App again to click on the app which you created, then click on Delete App and confirm to disable.


Thursday, September 22, 2011

How To Get Facebook Notifications On Your Desktop


Get Desktop Alerts Of Facebook Activity with What’s Up! for Facebook


You can not use your computer without being on Facebook.! Then you are among the many that connect to social networks, and even if you do not use it for a while ‘time, then you may leave it off  in the background or in some browser tab. If you need to get notified up with all new notification from Facebook on your desktop, here is a simple way for it...!!!


What’s Up! Facebook is an incredible Google Chrome browser Add on that starts working instantly from the moment you download onto your computer, making life easier that you only need to have your Google chrome open leaving your Facebook account logged in all the time, with an open tab for Facebook account. It shows an alert, if you get a notification.Use of classic Windows Live Messenger can help us to get notified  from all  the events from social networks. You will be well warned about any friend requests, new comments, post on your bulletin board and much more. You can install the addon from the Chrome Web Store page

Download What’s Up! Facebook for Google Chrome


Thursday, August 25, 2011

Add Facebook Chat Window in Firefox sidebar


How to add Facebook Chat Window in Firefox sidebar ?


Wouldn’t it be nice if we can chat with our Facebook friends even if we’re browsing other websites or while watching a YouTube video?
Do you wish there’s a way to load Facebook chat on your Firefox sidebar?
Actually there is a way and I will show you in simple and easy steps.
Just Follow the instructions as below.


Trick 1:-

1. Go to http://www.facebook.com/presence/popout.php and bookmark it (click CTRL + D).

2. Click CTRL + B and your bookmarks will appear on the sidebar. Now, look for the Facebook chat bookmark.

3. Right-click on it and click Properties. Check “Load this bookmark in the sidebar” and click OK.


4. Now, when you want to chat with your Facebook buddies,
just click that bookmark and Facebook chat will now load in your sidebar.
You can visit other websites, watch online videos while chatting with them.


Trick 2:-


Step 1 :


Click “Bookmarks” in the menu bar of your web browser. And click “Organize Bookmarks“.


Step 2 :

Click “New Bookmark” and enter the below details.
In the Name field enter “Facebook Chat Window
In the Location field enter “http://www.facebook.com/presence/popout.php”
Enable the checkbox “Load this bookmark in the sidebar”


Step 3 :


To enable the sidebar in Firefox browser, click “View” in the menu bar and select “Sidebar > Bookmarks


Step 4 :


Click “Facebook Chat Window” in the sidebar of your browser


Thats it,
Now you can find your Facebook mates waiting to chat with you.
Enjoy chatting while browsing your favorite websites on the right side of the browser.
Bye, till I catch you with another “Facebook Tip”.