Ads 468x60px

Wednesday, August 31, 2011

How to create a folder with name CON ??


Cannot Create Windows Folder Named Con

Learn How to create it.


According to a rather breathless little message, which circulates via email and online, it is not possible to create a folder named "CON" on a Microsoft Windows based computer.

The message claims that not even Bill Gates or the whole Microsoft "Team" can explain why this might be so.


It is in fact perfectly true that you cannot create a folder named "CON", nor can you rename an existing folder to "CON". However, there is no mystery surrounding this restriction whatsoever. The "team" at Microsoft, and a great many others besides, know perfectly well why you cannot name a folder "CON". "CON" and a number of other character strings are in fact reserved names that go back to the days of DOS and cannot be used to name folders or files. Other reserved names are:


  • PRN

  • AUX

  • NUL

  • LPT1

  • COM1

  • Potential drive letter - A: to Z:

  • A number of others


If you try to name a folder using one of these reserved names, the name will automatically revert to the default, generally "New Folder". Moreover, if you try to use a reserved name to name a file such as a Notepad or Microsoft Word document you will generally receive an error message similar to the following:


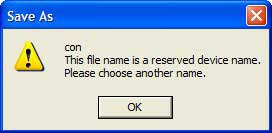
Depending on exactly how you save the file, you may instead receive a warning message advising that a file with that name already exists. However, even if you choose "Yes" to overwrite the existing file, you will still not be allowed to save the file.


It should be noted that, by entering the right sequence of commands via the command prompt, it is usually possible to circumvent the restriction in Winodows and create a folder using a reserved name. However, this may cause other problems and is not advisable, especially for more inexperienced users.


While there is no mystery about this issue, it might have saved user confusion if Windows displayed an explanatory error message when attempting to create a folder with a reserved name as well.


For more detailed information see:


Now Come on the Title Topic,


CON is an abbreviation of CONSOLE.

In windows u cant create a folder named by certain keywords like CON, NUL, AUX, COM1 to COM9 and LPT1 to LPT9....


it is possible to create con folder with some trick.


At command prompt do the following to create the CON folder


md \\.\\c:\con


And to remove directory it works like this:


rd \\.\\c:\con


Another Easy method :-


Right click on the folder click on rename.

Now type CON then alt+0160.

That's it...!!!

Yes u have done it...!!!


Google Chrome OS Available for Download


Google Chrome OS 


Google Chrome OS, shortly known as Chrome OS or fully known as Google Chrome Operating System, is the new open source operating system designed by Google.

The Google OS itself is based around the Linux operating system and targets specific types of hardware.


You may have heard that Google is putting together a little operating system called Google Chrome Operating System. The idea is to extend the work Google has already put into the Google Chrome web browser and build a light weight OS that can run on x86 or ARM processors. The goal is to have an OS that can boot and get you online in a matter of seconds, while most of the applications will be web-based.


And that makes sense, because most of Google's applications are web-based. Think Gmail, Google Docs, Google Talk, Google Reader, and so on. Heck, even Google's desktop applications like Picasa and Google Desktop have online components.


In the official blog post announcing Google Chrome Operating System, Google also mentions that all development for the platform will be web-based. So if you want to create a new office suite or a farting application, you'll write it for the web, and the apps will be available for Chrome, Windows, Mac, or Linux.


What remains to be seen is whether Google Chrome will run any desktop applications at all. The operating system will be based on the Linux kernel, but that doesn't mean it will be able to run Linux applications like OpenOffice.org, or Pidgin.


The web-app approach makes a lot of sense for netbooks, cheap portable computers that are generally considered secondary PCs instead of primary machines. Because if your email, office documents, and other data are stored on the web, there's no need to continually synchronize your data between a netbook and your primary machine. And in fact, Google says that netbooks will be some of the first devices to run the operating system, with Chrome-powered netbooks due out in the second half of 2010.


But would you be happy running web apps as your only applications on your primary computer? Or even on a secondary machine. What happens when you're on an airplane without WiFi? Does your computer become useless?


While some folks will inevitably call Google Chrome a Windows-killer, because everything that's ever introduced clearly has to kill something else for its survival (/end sarcasm), it looks to me more like a Jolicloud killer. Jolicloud is a Linux-based, netbook-specific operating system founded by Tariq Krim, the guy behind the Netvibes personal start page.


Netvibes brings a whole slew of web and social networking-based elements to a desktop operating system. Users can install "applications" that are web-based including Meebo, Google Docs, or Twitter to their desktop. Once installed, you can launch a Mozilla Prism-based browser that will open those web apps by clicking on a desktop icon. You can add contacts to your Jolicloud profile and track what apps your friends are using.


But Jolicloud, which is based on Ubuntu, also lets you install full Linux desktop applications. You can install media players, office suites, or image editing software and use your netbook even when there's no internet connection around. Of course, by eliminating these options, Google Chrome Operating System may be able to be lighter weight, taking up less space, fewer system resources, and booting faster. But I kind of wonder whether Chrome has what it takes to best Jolicloud, let alone Windows or OS X. How far will the Google name alone take this operating system?


As The Business Insider points out, there's another challenge facing Google Chrome Operating System as well: Google's history of introducing really cool products and then kind of forgetting about them a few months down the road. Think Jaiku, Google Notebook, Google Browser Sync, Lively, Dodgeball, and the other Google services that have died in recent years.


You Can Download and Experiance The Latest Chrome OS from the Below Link


Add translation bot to google talk


How to Add translation bot to google talk


Sometimes we need to chat with person of different language.This one makes us open up our browser time and again to find out different meanings.


I've a solution for this.


If we add a translation bot to the Gtalk (Google Talk) that will take the input string and parse to required the translated form.Here is a simple method to do so.All we have to do is to find out the code used by Google translator for a particular language.


For this you will not need any Software.


Just follow the steps given below.


Just add particular contact list through Gtalk.


The format should be like this : source2destination@bot.talk.google.com


[from language]2[to language]@bot.talk.google.com


I added English to Hindi bot. [en2hi@bot.talk.google.com] and Here is the screenshot of my conversation with the bot.


Indian Languages Bots :


Hindi            en2hi@bot.talk.google.com


Tamil            en2ta@bot.talk.google.com


Telugu          en2te@bot.talk.google.com


Kannada      en2kn@bot.talk.google.com


Malayalam   en2ml@bot.talk.google.com


All Other Available Bots:


  • ar2en@bot.talk.google.com (Translate from arabian to english)

  • en2ar@bot.talk.google.com (Translate from english to arabian)

  • bg2en@bot.talk.google.com (Translate from bulgarian to english)

  • de2en@bot.talk.google.com (Translate from german to english)

  • en2de@bot.talk.google.com (Translate from english to german)

  • de2fr@bot.talk.google.com (Translate from german to french)

  • fr2de@bot.talk.google.com (Translate from french to german)

  • el2en@bot.talk.google.com (Translate from greek to english)

  • en2el@bot.talk.google.com (Translate from english to greek)

  • es2en@bot.talk.google.com (Translate from spanish to english)

  • en2es@bot.talk.google.com (Translate from english to spanish)

  • fi2en@bot.talk.google.com (Translate from finnish to english)

  • fr2en@bot.talk.google.com (Translate from french to english)

  • en2fr@bot.talk.google.com (Translate from english to french)

  • hi2en@bot.talk.google.com (Translate from hindi to english)

  • hr2en@bot.talk.google.com (Translate from croatian to english)

  • it2en@bot.talk.google.com (Translate from italian to english)

  • en2it@bot.talk.google.com (Translate from english to italian)

  • ja2en@bot.talk.google.com (Translate from japanese to english)

  • en2ja@bot.talk.google.com (Translate from english to japanese)

  • ko2en@bot.talk.google.com (Translate from corean to english)

  • en2ko@bot.talk.google.com (Translate from english to corean)

  • nl2en@bot.talk.google.com (Translate from dutch to english)

  • en2nl@bot.talk.google.com (Translate from english to dutch )

  • ru2en@bot.talk.google.com (Translate from russian to english)

  • en2ru@bot.talk.google.com (Translate from english to russian)

  • uk2en@bot.talk.google.com (Translate from ucranian to english)

  • ur2en@bot.talk.google.com (Translate from urdu to english)

  • zh2en@bot.talk.google.com (Translate from chinese to english)

  • en2zh@bot.talk.google.com (Translate from english to chinese)


  • Once the correct bots are added, they will do their job both in Gmail and other Google Talk implementations like the iGoogle start page, but group chats don’t appear to work in third-party clients such as Apple’s iChat.

  • The program is by no means perfect; anyone who has had experience with Google’s translation dictionaries will know that translating with automation doesn’t always work.


  • All things considered, Google Talk’s automated translation abilities are certainly a welcome communication innovation. Users will simply need to remain patient and understanding when mistranslations inevitably happen. Google’s language dictionaries will undoubtedly improve over the coming months and years, bringing even more users together through the simple power of chat.


Tuesday, August 30, 2011

Turn Internet Explorer into Google Chrome


Turn Internet Explorer into Google Chrome Looklike


Its called Chrome Frame, and it is a new browser plug-in developed by Google to give you a Chrome browsing experience inside of Internet Explorer.

Let me restate that slightly to make it more clear:

Chrome Frame turns IE into Chrome


With Google Chrome Frame, developers can now take advantage of the latest open web technologies, even in Internet Explorer. From a faster Javascript engine, to support for current web technologies like HTML5's offline capabilities and <canvas>, to modern CSS/Layout handling, Google Chrome Frame enables these features within IE with no additional coding or testing for different browser versions.


Here is the catch :


Microsoft is warning IE users that it does not recommend installing the plugin. What does the company have against the plugin? It makes Internet Explorer less secure.


Given the security issues with plugins in general and Google Chrome in particular, Google Chrome Frame running as a plugin has doubled the attach area for malware and malicious scripts.


Watch this official video for more: 


Set Google as Your Desktop Wallpaper


Set Google.com as Desktop Wallpaper Background in Win XP.


The trick simple and you won't need any third party software to set a website as the desktop wallpaper.


If you do not have Knowledge of Html or web then just follow the first Simple Trick.


If you have some basic knowledge of html then you can follow the Second Trick.


Simple Trick :-


  • Just Download the below file

  • To Download,  ...Click Here...

  • save it on your hard drive.

  • Now right click on the desktop and choose properties.

  • Select display tab, Browse and locate to the file Downloaded by you.

  • Select that file. After selecting that file click on apply.

  • That's it enjoy .


Second Trick (another method by html) :-


You'll need only simple text editor like a notepad to execute this trick.


  • Type the html code given in the below image into a notepad.


  • The text in red is name of the website to be kept as wallpaper.

  • Save it with .html extension and the name can be as per your choice.

  • Now right click on the desktop and choose properties.

  • Select display tab ,browse and get the .html file created by you.After selecting that file click on apply.

  • That's it enjoy .


Note :- This isn't possible in Windows Vista & Windows 7 as Active Desktop feature has been removed from Windows Vista & Windows 7.


GMail Notifier - The easier way to check your Gmail


GMail Notifier - The easier way to check your mail  


=> Get Gmail for your Desktop.


Tired of checking your Gmail ? Have more than one account ? Gmail Notifier is the perfect solution for you - and its free ! With more than 20,000 users world wide, including Google Apps users, Gmail Notifier is becoming increasingly popular.


Gmail Notifier gives you:


  Counter of unread emails

  Sound and tray icon alerts

  Read email headers and body

  Delete emails or mark as read

  IMAP connectivity over SSL

  Fast and easy Gmail login

  Support for multiple accounts

  Support for UTF-8 emails

  Support for mailto links

  Support for Google Apps

  Attachment indicator

  100% spy and spam free

  Auto version updates

  Make window topmost

  Run at startup


Language localization:


  English, Français, Español, Italian

  Deutsch, Dutch, Russian, Polish

  Chinese, Japanese, Korean


You Can Download The Gmail Notifier from the link Below


Monday, August 29, 2011

Top Keyboard Shortcut Keys for Windows Users


Useful Keyboard Shortcut Keys for Windows Users


These days people are very interested to use shortcut keys, so i listed out the top useful shortcut keys,

I will publish the whole shortcut keys list later.

Now let us see the mostly used desktop shortcut keys


Few of these keyboard shortcuts work in XP, Vista as well as Windows 7 but most of the shortcuts I'll be talking about on this page will only work on Microsoft's newest Operating System (Windows 7).


Windows key + E = Explorer

Windows key + Break = System properties

Windows key + F = Search

Windows key + D = Hide/Display all windows

Windows key + R = Run command pop-ups

ALT + Tab = Switch between windows

ALT, Space, X = Maximize window

CTRL + Shift + Esc = Task Manager

CTRL + C = Copy

CTRL + X = Cut

CTRL + V = Paste

CTRL + Z   = Undo an action

CTRL + Y  = Redo an action

CTRL + A  =Select all items in a document or window

F1 = Display Help

F2 = Rename the selected item

F3 = Search for a file or folder

F4 = Display the Address bar list in Windows Explorer

F5 = Refresh the active window

F6 = Cycle through screen elements in a window or on the desktop

F10 = Activate the menu bar in the active program


Other Useful Shortcut Tips :-


In any Windows program you can use Edit in the menu at the left-hand top of the page to copy something that you have highlighted to the Clipboard. And you can use Edit to Paste the text or image that has been placed on your Clipboard into another document or another section of the document you're working on. But you don't need to do that. Once you have something highlighted that you want to copy to the Clipboard, just hold down the Ctrl key and type the letter c and it's sent to your Clipboard. Then make your curser blink at the place where you want to place the copied material and use Ctrl v and it's pasted there. If the highlighted text or image is something you want to remove from where it is and place it somewhere else, use the Cut command. But don't muck around with Edit in the menu to do that. Use the keyboard shortcutt Ctrl x and it's gone and saved to your Clipboard. Now you can paste it anywhere you want with Ctrl v. And you can save your work in any Windows program with Ctrl s. You really don't need to mouse up to File and click that and then click Save.


Highlighting  Text :-


Here's a few tips on how to do that. Let's say you wanted to highlight the last part of my last sentence so that you could copy that to your clipboard in order to paste it into another document you're working on. To do that you need to make your curser begin blinking at the beginning of the word here's and then move your mouse's arrow (it may look like the letter I) to the end of the word that and then hold down the Shift key and click your mouse. This will highlight the phrase here's a few tips on how to do that. If you want to highlight a single word, just double-click it. You probably already knew that but here's something you may not know - you can highlight an entire paragraph by triple-clicking anywhere inside it. Give it a try. Triple-click anywhere inside this paragraph. Of course you can highlight this entire page or any entire page by using Ctrl a. To undo highlights just click anywhere on the page.


This is the list of keyboard shortcuts that I use a lot.


Minimize open window                              - Alt + Spacebar + m

Make a window less than full-screen          - Alt + Spacebar + r

Make a window full-screen                        - Alt + Spacebar + x

Close a window                                         - Alt + F4

Switch to any window open in the Taskbar - Hold Alt and press TabS

Undo last action (I love this one!)               - Ctrl +z


This is the list of keyboard shortcuts used with Windows key.

If you have a WinKey it will be the key with the flag on it between your Ctrl key and your Alt key.


WinKey + D       = Minimizes all windows and shows the desktop

WinKey + L       = Locks the computer (Windows XP only)

WinKey + Tab   = Cycles through the programs shown on the taskbar

WinKey + F       = Brings up the Windows Search box

WinKey + E       = Opens up Windows Explorer

WinKey + R       = Opens the Run dialog box

WinKey + Pause = Opens System Properties


Other Useful Shortcut for Windows 7 :-


Win-key plus (1 through 9)···Opens the corresponding program on your taskbar.

Alt plus Win-key plus (1 through 9)···Opens the Jump List of the corresponding program on your taskbar.

Win-key plus Tab···Activates Flip 3d.

Ctrl plus Win-key plus Tab···Freezes Flip 3d. Use Esc key or click a window to deactivate Flip 3d.


Well, that's it for the Windows  keyboard shortcuts.

If I've left out something important, please let me know by informing me by my Contact page.


At the End:- To make this page and all of the other of my Blog easy to find, type Ctrl + d to bookmark me and come back once a week or so and see what's new.


Thursday, August 25, 2011

Internet Download Manager 6.07 Build 3 Final


Internet Download Manager 6.07 Build 3 Final


Internet Download Manager has a smart download logic accelerator that features intelligent dynamic file segmentation and safe multipart downloading technology to accelerate your downloads.
Unlike other download accelerators and managers that segment files before downloading starts, Internet Download Manager segments downloaded files dynamically during download process.
Internet Download Manager reuses available connections without additional connect and login stages to achieve better acceleration performance.


What’s new in version 6.07

* Added additional options on “Download progress” dialog
* Made a workaround for odd characters in file names when downloading from youtube
* Fixed bugs
What’s new in version 6.07 build 3
(Released: Jul 14, 2011)
Enhanced “start download” dialog
Fixed bugs
SIZE : 4.6 MB
With Patch


Download it from the Below Link

Add Facebook Chat Window in Firefox sidebar


How to add Facebook Chat Window in Firefox sidebar ?


Wouldn’t it be nice if we can chat with our Facebook friends even if we’re browsing other websites or while watching a YouTube video?
Do you wish there’s a way to load Facebook chat on your Firefox sidebar?
Actually there is a way and I will show you in simple and easy steps.
Just Follow the instructions as below.


Trick 1:-

1. Go to http://www.facebook.com/presence/popout.php and bookmark it (click CTRL + D).

2. Click CTRL + B and your bookmarks will appear on the sidebar. Now, look for the Facebook chat bookmark.

3. Right-click on it and click Properties. Check “Load this bookmark in the sidebar” and click OK.


4. Now, when you want to chat with your Facebook buddies,
just click that bookmark and Facebook chat will now load in your sidebar.
You can visit other websites, watch online videos while chatting with them.


Trick 2:-


Step 1 :


Click “Bookmarks” in the menu bar of your web browser. And click “Organize Bookmarks“.


Step 2 :

Click “New Bookmark” and enter the below details.
In the Name field enter “Facebook Chat Window
In the Location field enter “http://www.facebook.com/presence/popout.php”
Enable the checkbox “Load this bookmark in the sidebar”


Step 3 :


To enable the sidebar in Firefox browser, click “View” in the menu bar and select “Sidebar > Bookmarks


Step 4 :


Click “Facebook Chat Window” in the sidebar of your browser


Thats it,
Now you can find your Facebook mates waiting to chat with you.
Enjoy chatting while browsing your favorite websites on the right side of the browser.
Bye, till I catch you with another “Facebook Tip”.

Tips & Tricks for Google Talk Users


Tips for Google Talk Users


Google Talk is a Windows Application by Google for using as a messenger and quickly talk with their friends and buddies for free.
Calls are made through the computer using the latest voice technology. For this all you need is an Internet Connection, a microphone and a speaker.

Here are Some Tips & Tricks for Google Talk Users

Some Shortcuts :

* CTRL + Mousewheel up/down over input textbox: Change the font size of the textbox.
 * F9: Open Gmail to send an email to your friend
 * F11: Start a call with your friend
 * F12: Stop the current call
 * ESC: Close the current window
 * ALT + ESC: Minimize the current window
 * TAB: Switch between multiple chat windows
 * CTRL + I: Same as TAB
 * SHIFT + TAB: Same as TAB but in reverse order
 * CTRL + TAB: Same as SHIFT + TAB
 * Windows + ESC: Open Google Talk (if it is minimized, or in the tray)

Secret Startup Parameters :

More parameters for Gtalk Start -> Run Here’s a complete list of what you can do with Gtalk in run command prompt.

“C:Program FilesGoogleGoogle Talkgoogletalk.exe” /parameter

* /nomutex: allows you to open more than one instance of Google Talk

* /autostart: when Google Talk is run with this parameter, it will check the registry settings to see if it needs to be started or not. If the Gtalk Start automatically with Windows option is unchecked, it won’t start.

* /forcestart: same as /autostart, but forces it to start no matter what option was set.

* /S upgrade: Used when upgrading Google Talk

* /register: registers Google Talk in the registry, includig the GMail Compose method.

* /checkupdate: check for newer versions

* /factoryreset: set settings back to default.

* /mailto email@host.com: send an email with Gmail

* /diag: start Google Talk in diagnostic mode

* /log: probably has something to do with the diagnostic logging

Wednesday, August 24, 2011

How to Enable or Disable Hibernation in Windows 7


How to Enable or Disable Hibernation in Windows 7


Enabling or Disabling the “Hibernate” option in Windows 7 or Vista is not as simple as it used to be in Windows XP. For Windows 7 a different approach has to be followed to accomplish the same job. In this post you will find how to enable or disable the Hibernate option in Windows 7.


Hibernation is a power saving option which was designed primarily for laptops. Unlike “sleep mode” which puts the open documents and files into the memory, hibernation puts all the open files and documents on to the hard disk and shuts down the computer without drawing even a small amount of power. Thus hibernation becomes an excellent way to save power and resume Windows back to the state where it was left off. If you really want to use this feature on Windows 7 then you need to enable this option. This can be done as follows.


1. Open the Command Prompt with “Administrator rights”. To do so, type cmd in Start menu and then hit Ctrl+Shift+Enter.
2. Now type the following command in the command prompt and hit Enter.
3. Type exit and hit Enter to close the Command Prompt. Now you should see the “Hibernate” option in the Start menu. If not then perform the following steps.
A. Type Power Options in the Start menu and hit Enter.
B. In the left pane, open the link labeled “Change when the computer sleeps” and then open the link “Change advanced power settings”.
 Now a small window will pop-up as shown below:


C. Now expand the Sleep tree and turn off Allow Hybrid Sleep as shown in the above screenshot.
D. Now you should see the Hibernate option in the Start menu.


How To Send Bold & Underline Text In Facebook Chat


How To Send Bold & Underline Text In Facebook Chat


People try to learn more and more facebook tricks so that they can amuse their friends.
Well, today I am going to teach you a cool facebook chat trick to send bold and underlined text in facebook chat.
This trick doesnot require any technical knowlege and it can be used by using just simple codes
In the picture below you can see that I have sent bold and underlined text in facebook chat


Now here are the facebook codes for sending bold and underlined text in facebook chat.


For Sending Bold Text

  • whatever you type between * *(two stars ) will automatically turns into bold.

  • Example : You write

I *really* mean it.
Turns to
I really mean it.


For sending underlined Text
  • Whatever you type between _ _(two underscores) will automatically turns into underlined text 

  • Example: You write

I really _mean_ it.
Turns to
I really mean it.


For writing Bold+Underline
  • Whatever you type between *_ _* will automatically turns into Bold+Underline

  • Example:

You *_mean_* it?
Turns to
You mean it?


We all use facebook but still alot of us are unware of how to use smileys in chat.Some of us just think how the other person have sent a smiley.Well it is very simple to send smileys in facebook chat.You have to just enter a code and it will automatically convert into a smiley.I am providing here a complete list of smiley codes that can be used on facebook.Even if you already use or know some of the codes even then you will find this list very useful becuase you will find a lot of new codes


Click the Image to Enlarge it.
If you liked this post then dont forget to like it on facebook.

Reset Your Mobile Memory Card Password in 2 minutes

Reset Your Mobile Memory Card Password in Just 2 minutes with Explorer


We usually set password for our memory card for privacy and security, but the common mistake every one does at least once in out life time forgetting password. If you set password for mobile memory card, then you should be not forget the password. If you does then the only option is to formate your memory card with the help of the card reader and eventually the loss of all your data stored on it. There is a way to break the security wall. If you are a Symbian device lover then no need to worry about the password. You can crack them in few minutes.

In this tutorial I am going to Explain you How to reset your memory card password in easy step. Before we start you need to have X-plore (application used to explore your system files and folder even the hidden folders in your device)


Step1:
Install X-Plore in your mobile. If you want to download X-Plore search around internet you can download free trail.
( Note : you can also use other file explorer Softwares for this trick )


 Step2: 
Open your X-plore apps and Press 0(Zero) and check which you have marked the "show the system files"

 Step3: 
Once you done that now go to the following path C:/Sys/Data/Mmcstore

 Step4: 
Once you reached there you need to press "3" under option to set it in the Hex-viewer

 Step5:
See the third column you will able to see a line of code ! TMSD02G (c??"?x???6?2?6?2?6). Just check the character between the "?" it is your password ie: 62626


 Note: If you have not set the password, then you will not able to gain access to C:/Sys/Data

15 General Tips and Tricks for Nokia Users

Useful General Tips and Tricks for Nokia Mobile Users


These are the Some General Tips and Tricks for Nokia Mobile Users which will be helpful.


Tips 1 : Do u know how to use the edit button (abc or pencil button)?

 Heres how... In the inbox for example; u wanna delete multiple sms, simply hold the edit button, scroll down, and then, press c to delete the marked sms. The edit button can also b used to copy and past text in sms, simply hold it and scroll across, choose copy. Pretty good for placing song names in ngages

Tip 2 : Format of Phone
Shit happens, on a smartphone, its inevitable u do something wrong, and tis calls for a format of Phone.
To format the fone, press *#7370#, then enter the lock code, which is the sec code of the Phone.
NOTE: batt must b full, else if format is disrupted by low batt, consequences will b disatrous.I heard the code *#7780# works too, pretty much the same i think.
 for 6600 users, to format the fone, theres an alternative way. Press and hold <3>, <*> and Call (Send) buttons, then power on fone, keep holding on the 3 buttons, till u come to a format screen. This method ONLY works on 6600, and need not enter the sec code. BUT sec code would be reset to default 12345.
Tip 3 : TO N-GAGE USERS;
Did u know u can install .sis files simply using the cable given? Juz plug it in, place the .sis file anywhere on e: (the mmc), not in any folders, root of e:, disconnect, then look for it in manager.
Tip 4: Save on battery and system memory
Save on battery and system memory being used by regulary checking the task manager which can be accessed by holding down the menu button!!
 Tip 4a: Set the screen saver to a short time out period to prolong battery life.
 Tip 4b: Avoid restarting the phone, or repeatedly turning it on and off. This helps increase battery life.
Tip 5:
Type *#06# to display your IMEI serial number, very valuable for the unlocking your phone to other sim cards
Tip 6:
Type *#0000# to view which firmware version you are running
Tip 7:
If you would like to avoid being "blue jacked", keep bluetooth turned off, or set your phone's visibility to hidden.
Tip 8:
Don't want to carry a watch and a phone? Set the screen saver to show date and time, then you can ditch the watch.
Tip 9: Save memory
Save memory when installing apps, by installing over bluetooth. This can be done using the nokia phone suite and a bluetooth serial connection. Only works with .SIS files, so java still has to be sent to the phone, but will save space when using .SIS files.
Tip 10: Operator logos
Use a filemanager like FExplorer or SeleQ to add the folders: "c:/system/Apps/phone/oplogo". Add a .bmp picture to folder "oplogo" and restart your phone! The .bmp picture size needs to be: 97 x 25 pixels
Tip 11: Check if the recepients phone is on
 Delivery reports
 or
 Type *0# your message in the message composer window space then write your message, the recipient will not see the star zero hash bit - just the message When they read it it will relay a message back to your fone showing the time they recieved it. (haven't yet tried it myself though)
Tip 12: BlueJacking

First up, you need to know what Bluetooth is. There are lots of types of modern devices that incorporate Bluetooth as one of their many features. PDAs, mobile phones and laptops are a few of these modern devices. Bluetooth means that Bluetooth enabled devices can send things like phonebook/address book contacts, pictures & notes to other Bluetooth enabled devices wirelessly over a range of about 10 metres. So, we've got past the boring part. Now, using a phone with Bluetooth, you can create a phonebook contact and write a message, eg. 'Hello, you've been bluejacked', in the 'Name' field. Then you can search for other phones with Bluetooth and send that phonebook contact to them. On their phone, a message will popup saying "'Hello, you've been bluejacked' has just been received by Bluetooth" or something along those lines. For most 'victims' they will have no idea as to how the message appeared on their phone.
Tip 13:
While you are viewing a picture in your phone's gallery, press one of these shortcut keys (definitely works on 6600, not sure about other symbians)
1 - turn image anticlockwise
3 - turn image clockwise
* - toggle on/off of full screen
5 - zoom in
0 - zoom out
Tips 14 :
u can select all files in a folder by selecting THE folder and copy it then paste it somewhere. However u need to make a new directory. Fexplorer wun let u copy that folder together. Well seleQ can mark files to copy but it really takes time!
Tips 15 :A soft and Hard reset
A Soft-reset - the process of resetting all the settings of the phone to the factory default! No applications are deleted! A Hard-reset is like formatting a drive! It does format the memory. Everything that has been installed after the first use of the phone is deleted! It will recover the memory of the phone to the state you purchased it! It is done by inputing the following code: *#7370# NOTE: The battery must be full or the charger has to be connected to the phone so that it does not run out of power and make the phone unusable.

Windows 7 Themes Download


 windows 7 Themes


Click the link Below to download 150+ Windows 7 themes

Download Link

15 Best Windows 7 Tips and Tricks

15 Best Windows 7 Tips and Tricks


Here are 15 Best Windows 7 Tips and Tricks Which will be Helpful to you and you can feel the best Experiance of your Windows Operating System.


1. Use Keyboard Shortcuts
Using the mouse, you can drag-”˜n-dock windows to either side of the screen, or drag it to the top to maximize it. These keyboard shortcuts are even faster:
Win+Left Arrow and Win+Right Arrow dock the window to the left and right side of the screen
Win+Up Arrow and Win+Down Arrow maximize and restore/minimize
Win+M minimizes everything
Alt+Up, Alt+Left Arrow, Alt+Right Arrow navigate to parent folder, or browse Back and Forward through folders in Explorer
Win+Home minimizes/restores all open windows except the active window
Alt+Win+# accesses the Jump List of program number ‘#’ on the taskbar
2.Rearrange System Tray Icons


You can rearrange icons on the taskbar as you wish and start new (or switch to running) instances of the first ten taskbar programs using Win+1, Win+2, and so on. The cool thing is you can also rearrange system tray icons. Reorder them on the tray or move them outside or back in the tray. Take control of what you want to always keep an eye on, and from which apps you’ll require notifications.

3. Access Jump Lists with the Left Mouse Button


Jump Lists usually show up when you right-click on a taskbar icon. However, they can also be accessed by holding the left mouse button and dragging upwards. If you’re using a laptop touchpad or a touch screen, this is convenient because you do not have to click any button to access a context menu.

4. Add Any Folder to Favorites


You can add any library or folder to the Favorites section in Windows Explorer. To add a folder, navigate to it in Explorer, right-click Favorites in the left navigation pane, and select Add current location to Favorites. Now you get quick access to your favorite folders in all File->Save As dialogs...!!!

5. Pin Frequently Used Folders to the Taskbar


Right-click, drag, and pin your favorite folders to Windows Explorer on the taskbar. They will now show up in the Jump List when you right click on Explorer giving you quick access to your favorite folders.

6. Pin Control Panel to the Taskbar


You cannot pin the Control Panel to the taskbar via the Start Menu or by drag and drop. Open the Control Panel and right-click its taskbar icon to pin it to the taskbar. An advantage of this is that Control Panel’s Jump List allows quick access to recently used functions.

7. Create Keyboard Shortcuts for Programs


You can create keyboard shortcuts for any program in Windows 7. Right-click the program icon and select Properties. Select the Shortcut tab, click in Shortcut key, to set the keyboard shortcut for that program.


8. Open Command Prompt in Any Folder


Like the command prompt? Miss the “˜Open Command Window Here’ Windows XP power toy? Press “˜Shift’ when right-clicking on a folder to get that option in the context menu. This also works on the desktop. No power toy required!


9. View Expanded ‘Send To’ Menu

Press Shift when right-clicking on a folder to get an expanded Send To menu.

10. Adjust Screen Text with Clear Type

Use Clear Type Tuner for the best look on your LCD monitor or laptop screen. Run “˜cttune.exe‘ from the Start Menu search box, or go to the Control Panel Display applet, and select Adjust ClearType Text from the left.

11. Get Exact Colors On Your Screen

If you are an artist or you work with colors, use the Calibrate Color option in the Control Panel Display applet or run dccw.exe from the Start Menu search box. You can adjust gamma, brightness, contrast, and color balance, ensuring that colors are displayed correctly on your screen.

12. Customize the Power Button

If you restart your computer more often than you shut it down, change the default Shutdown power button to Restart. Right-click on Start, select Properties, and choose the Power button action that you use the most.


13. Customize Number of Items in Jump Lists & Start Menu

Right-click Start, select Properties, click Customize and choose the number of recent programs to be shown in the Start Menu and the number of items displayed in Jump Lists from the Start Menu Size section below.

14. Search Internet from the Start Menu


Enable Internet search from the Start Menu using your default browser. Run GPEDIT.MSC from the Start Menu search box to start the Group Policy Editor. In the left pane, go to User Configuration->Administrative Templates->Start Menu and Taskbar. In the right pane, right-click to Edit and Enable Add Search Internet link to Start Menu.


15. Add Videos to Start Menu


Windows 7 does not place a link to your videos on the Start Menu by default. To add a link to your videos on the Start Menu, right-click Start, select Properties, click on Customize. In the Videos section at the bottom, choose Display as a link.