Ads 468x60px

Featured Posts

Thursday, January 17, 2013

Disable Auto CHKDSK During Windows Startup

One of Windows annoying so called “feature” is  CHKDSK being automatically being run whenever you don’t shut down your computer properly. You get the blue colored screen that says “Checking file system on C: The type of the file system is NTFS. One of your disks needs to be checked for consistency. You may cancel the disk check, but it is strongly recommended that you continue. To skip disk checking, press any key within 10 seconds(s).
Simply pressing any key would stop CHKDSK from running but when you restart your computer, you’ll get this prompt again. Sometimes even after letting CHKDSK scan the drive that it wants to, CHKDSK would still automatically run at next boot! Here’s how to disable or stop CHKDSK at Windows bootup.

There are some people suggested to edit the registry but the proper way to disable CHKDSK from starting up is using the /x switch on chkntfs command in command prompt. The /x switch will exclude a drive from the default boot-time check. If you have drive C: as your hard drive, then the command to disable chkdsk from scanning C: drive would be:

chkntfs /x c:

If you have 2 drive, C and D, you can disable chkdsk with the command below

chkntfs /x c: d:


The chkntfs utility works by modifying the BootExcecute value in the system registry. The BootExecute value is located in the following, regisstry key
HKEY_LOCAL_MACHINE\SYSTEM\CURRENTCONTROLSET\CONTROL\Session Manager
The default value is for BootExecute is autocheck autochk *. When you use the /x switch, it will add a /k parameter prior to the asterisk. The /k parameter excludes volumes from being checked for the presence of a dirty bit.
For example, I run the command chkntfs /x c: in command prompt. This command would modify this registry entry to autocheck autochk /k:c *

There are some experts believe that it is better not to disable CHKDSK from scanning your hard drive. But as for me, I don’t want CHKDSK to scan my hard drive because if it finds anything bad, it will change the file to File00001.CHK. When that happens, I’ll have to use some third party tools to recognize and recover the CHK file.

Wednesday, December 28, 2011

Get Wondershare 1-Click PC Care free

Wondershare 1-Click PC Care Free Christmas Giveaway


Wondershare 1-Click PC Care is a powerful PC tune up utility to tune up your PC and let your PC run like new again. It costs about $49.95/Year. Although this turning is not well-known as TuneUp Utilities but still useful tool and helps you to speed up your PC system comprehensively and effectively.


Once Installed and started, Wondershare 1-Click automatically starts its diagnosis scan. The application performs three types of diagnosis: performance, stability and security. After the diagnosis scan, the application lists summary of all the problems and insecure settings found, which the user can fix by just a single click on the “Fix Now” button.


How To Get Wondershare 1-Click PC Care Free :

  • Visit the Giveaway Page by clicking here.
  • Click on the “Play Now” button. The link will Redirect you to Youtube where you have to view the video till the end and you will be asked Simple question at the end of the video.
  • Answer the Simple Question and then you will get the passcode.
  • Enter the passcode in the Giveaway page.
  • Enter the required details and click on the “Get Keycode” button
  • Check your mail.
  • That's all, eNjoY the software…!!!

Please Share this post on Facebook, Twitter and other networks from below.

How To Update Facebook Status Through Gtalk

How To Update Facebook Status Through Gtalk

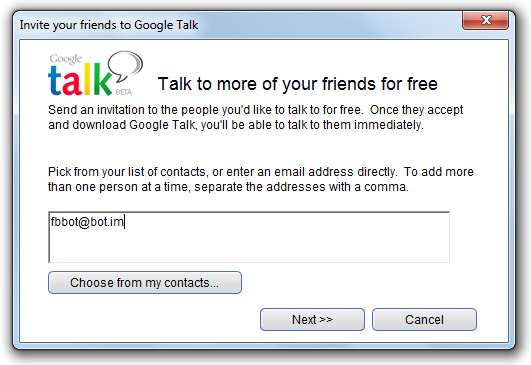
There are Multiple methods available to update status on Facebook right from your Browser, Mobile web or SMS. Now you can update your facebook status even from your Gtalk or any other IM Service you use. In my Previous post I have mentioned about the translation bot in GTalk. You just need to add a IM bot to your Gtalk and authorize it in short simple steps. You shall then post the message as such chatting with your friend. Easy to setup, You will be able to post the facebook status within a minute from now.
Just follow the Easy steps given below:

  • Invite fbbot@bot.im bot to your Gtalk (Once invited, the bot becomes Visible in couple of seconds).

  • Click Here and  Allow the app to access your facebook Account by clicking Allow button.


  • Once done, You will receive a long verification Code. just copy it
  • Now, Open the Chat window of the Bot and Send the Verification code.
  • You will receive this update on the Chat Window. “You are added. You can Start posting”
  • That's all, You can Start Posting status Now...!!!


Tuesday, December 27, 2011

Get Timeline for Your Facebook Profile

Get Timeline for Your Facebook Profile


The regular readers of my blog have already read about the timeline feature of facebook in my earlier post. Some of them have already enabled the timeline feature of the facebook by the facebook developer trick.
but some of the readers have not enabled the timeline feature till now due to the complex process of developer trick.
Now All facebook users can get the timeline feature bcoz Facebook has now decided to finally start rolling it out for the general public. It is way easier now to get this long awaited timeline feature.

All you have to do is just go to the Facebook Timeline presentation by clicking here and right there bottom right, click on the “Get Timeline” button as shown in the image below.

Click To Enlarge

This will enable will the Facebook Timeline 7 – Day Preview, that will allow you to edit, hide or delete the posts or pictures you don’t want the rest of the world to see!


After you are done with all of that, on the top of your profile page, now the timeline page, go ahead and click on the ”Publish Now” button and that’s it you have finally enabled the Facebook Timeline.


Saturday, December 17, 2011

How to Buy the Aakash Tablet

How to Buy the Aakash Tablet - The cheapest tablet computer in India


The Aakash tablet can only be ordered online and here is the complete process how to do it.
Yesterday i got a call from my friend asking about the booking process of the much awaited Akash Tablet. I booked the tablet but for all other Readers of my blog i have mentioned the complete booking process here.
The process is very easy and Explained step by step below.


Canadian company DataWind has started the online booking and pre booking of the much anticipated low cost Android tablet, Aakash. Online booking is for students' version of the Akash tablet and pre-booking is for the upgraded version of Aakash named UbiSlate 7.

Students' version of Aakash will be available for Rs 2,500 and will be delivered in seven days.
The upgraded commercial version, UbiSlate 7 is priced at Rs 2,999.
The payment mode for both the tablets is cash on delivery.

The improved version of Aakash tablet will be available in retail outlets by January end.
The tablet was to be made available in retail stores by the end of November. "The delay in the availability of the tablet has been due to upgradation in the tablet and some unforeseen delay in manufacturing," the spokesperson said.


To book and prebook student and commercial versions respectively of Aakash tablet, follow the steps.

  • Step: 1


First visit Datawind's website by clicking here.
click on order now if you want to purchase the student version of Aakash tablet.
If you want to place an order of upgraded version of Aakash tablet, Ubislate 7 ( which will be available by January end ) click on pre-book.


  • Step: 2

To Book the student version of Aakash Tablet:


You will see a form in which you have to fill your name, last name , email, mobile no, shipping address, city , state and pin code. These all are compulsory fields.
Apart from the above mentioned fields you will also see a query field, which is not mandatory, where you can ask your Question or Query.

To pre-book UbiSlate 7:

Here also you will get a form in which you have to fill your name, last name, email, mobile no, shipping address, city, state and pin code. These all are compulsory fields. And If you have any query you can write it in the last filed.


  • Step: 3

In case of booking the student version of Aakash tablet you will get a booking ID and a message which will state, "You will shortly receive an email confirmation from our support team with further details."

In case of pre booking of commercial version of the tablet, users will get a confirmation message which will state, "The commercial version of the Akash UbiSlate 7 would be launched in early weeks of December. After the commercial launch we would get in touch with you to deliver your device as soon possible."
As a matter of fact, the confirmation message a reader will see is factually incorrect as we have reported earlier the Aakash tablet will be available only by January end.

for any query one can call 1800-180-2180.